Following on from the recent article on “PSD to HTML”, this tutorial will look at taking a HTML/CSS template and turning it into a functioning WordPress theme. There is so much you can do when creating your own theme we couldn’t nearly cover it all. So, we’re going to look at how themes are structured, creation of the core files and splitting up that index.html file.
Overview – The Structure Of A WordPress Theme
The structure of a WordPress theme is fairly simple, I like to start with the CSS file. It details everything about the theme for WordPress to use. You then have index.php – it’s simply the template file you’re using with the PHP template tags included. Included with that is header.php & footer.php, files that are used across the whole site. Now most themes don’t use just four files and that’s because WordPress allows you to use template files to layout different content. There are the defined layout files, such as archives.php and single.php. However you can also create your own, say, if you wanted to make a page that had a totally different layout to the default.
Because this is such a large topic we’re splitting it into a two part series – this part making a simple but functioning theme from a standard HTML & CSS template, and the second part will look at adding more of the advanced features.
I will be working on turning the great template “Typography Paramount” by Six Shooter Media into a simple WordPress theme.
Step 1 – style.css
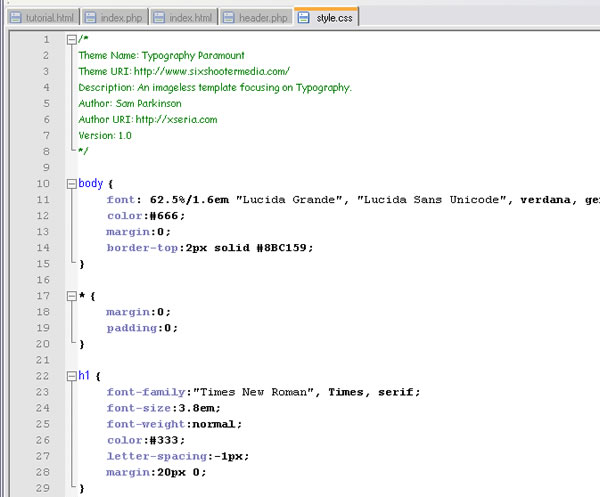
The style sheet is the defining file of the theme for WordPress. There are a few simple things you need to do. The first is renaming the main (if you have more that one) file to style.css, next you need to add a bit of commenting to the file.
/*
Theme Name: Typography Paramount
Theme URI: http://www.sixshootermedia.com/
Description: An image-less template focusing on Typography.
Author: Sam Parkinson
Author URI: http://xseria.com
Version: 1.0
.
General comments/License Statement if any.
.
*/
The code above is all contained in a comment, so it won’t affect the style definitions. Now I filled it out with a few details, these will be used by WordPress to display the details of the theme to admins. Make sure you add it to the top of the file with no white-spaces before it.
I’ve gone and renamed the style sheet file from the template, it was called 1.css. I have also made a new folder called typography-paramount which will be what I upload to the WordPress theme folder. Put the style sheet in this folder, but not under another directory otherwise it cannot be seen by WordPress.
Step 2 – The Header and Footer
In this step, we’re going to create the two files: header.php and footer.php. Although they are optional both are used in most themes, they’re not exactly hard to use either.
header.php
Starting with the header, create a new file in the theme folder called header.php, then open up index.html from the template and copy the following from it. This will become the header and will be displayed on every page of the site, bear that in mind when making other templates.
<!DOCTYPE html PUBLIC "-//W3C//DTD XHTML 1.1//EN" "http://www.w3.org/TR/xhtml11/DTD/xhtml11.dtd">
<html xmlns="http://www.w3.org/1999/xhtml" xml:lang="en">
<head>
<title>-</title>
<meta http-equiv="content-type" content="text/html; charset=utf-8" />
<link rel="stylesheet" href="css/1.css" type="text/css" media="screen,projection" />

</head>

<body>

<div id="wrapper">

	<div id="header">

	<p class="description">

	An imageless template focusing on Typography.

	</p>

	<h1><a href="#">Typography Paramount</a></h1>

	<ul id="nav">

	<li><a href="#">Link Here</a></li>

	<li><a href="#" class="active">Link Here</a></li>

	<li><a href="#">Link Here</a></li>

	<li><a href="#">Link Here</a></li>

	<li><a href="#">Link Here</a></li>

	</ul>

	</div>
We’re now going to add the WordPress template tags to header.php, these tell WordPress where to inject the various content into the theme. Also remember to change that link to the stylesheet.
<!DOCTYPE html PUBLIC "-//W3C//DTD XHTML 1.1//EN" "http://www.w3.org/TR/xhtml11/DTD/xhtml11.dtd">
<html xmlns="http://www.w3.org/1999/xhtml" <?php language_attributes() ?>>
<head profile="http://gmpg.org/xfn/11">
<title><?php bloginfo('name'); ?> <?php wp_title(); ?></title>
<meta http-equiv="Content-Type" content="<?php bloginfo('html_type'); ?>; charset=<?php bloginfo('charset'); ?>" />
<link rel="stylesheet" href="<?php bloginfo('stylesheet_url'); ?>" type="text/css" media="screen,projection" />

<?php wp_head(); ?>

</head>

<body>

<div id="wrapper">

	<div id="header">

	<p class="description"><?php bloginfo('description'); ?></p>

	<h1><a href="<?php echo get_option('home'); ?>/"><?php bloginfo('name'); ?></a></h1>

	<ul id="nav">
	<?php wp_list_pages('sort_column=menu_order&title_li='); ?>
	</ul>

	</div>
There’s quite a lot that’s been added but it’s all fairly simple when you look through it. All the tags above are well documented in the WordPress Codex. I’m just going to go through what each of the functions do.

 I am Mumbai based
0 Comments.